

Requirements
Before installing, please make sure your theme and extension have met the following requirements:
- This tutorial made for new or modified installations of OpenCart 2.x
- Make sure you have the installation .ZIP of the extension/theme which you need to translate
- Make sure that the target language has already installed in your OpenCart 2.x system. Please read this tutorial to install the new language.
- (Optional) Basic understanding of HTML
Step-by-step to translate Opencart Extension/Theme:
Step 1: Extracting
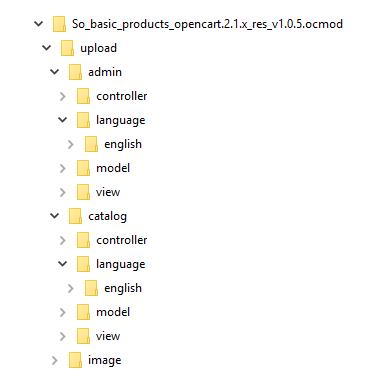
First of all, extract your extension installation .ZIP in a new folder. In most cases you will get a folder structure, similar to the image below:
Step 2: Renaming
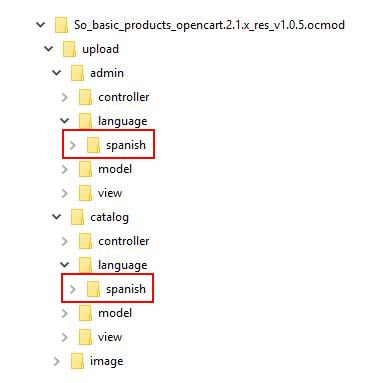
The folders are need to be changed:
- upload/admin/language/english
- upload/catalog/language/english
Important: We have just renamed the above 2 folders. To set the exact new name of the folders, please navigate to your OpenCart admin panel -> System -> Localisation -> Languages -> [Your Language, e.g. Spanish] -> Edit and find the value of the Directory field. In our example this will be "spanish".
Rename both of these folders to the language of your choice. The result should look something like this:
Step 3: Translating
From the previous step you should now have the following folders:
upload/admin/language/spanish and upload/catalog/language/spanishNow, you should access every file in these two folders and translate the English text to your preference. A single English language entry looks like this:
$_['text_column_left'] = 'Column Left';
The translation of this entry would look like this:
$_['text_column_left'] = 'Columna Izquierda';
Note: Some language entries contain special HTML or wildcard characters like <strong>http://</strong>, %s, <b></b> and others. Don't need to change these special words and translate only the text within these entries.
Step 4: Uploading
It's almost done. What you need to do now is to upload your new folders in your OpenCart installation, making sure to preserve the folder locations.
Note: If you have renamed your admin folder, make sure to upload the new language in your modified admin folder.
- upload/admin/language/spanish -> /<opencart-root>/<your-admin-folder>/language/spanish
- upload/catalog/language/spanish -> /<opencart-root>/catalog/language/spanish
You have translated your OpenCart extension. Translating OpenCart theme do the same. If you have any questions or need further assistances, please don't hesitate to let us know via the comments box below. We are happy and ready to help you.
Thanks for reading!


